Bottle blowing machines are essential equipment in the plastic packaging industry, used to manufacture PET, PP, and PC containers for beverages, cosmetics, pharmaceuticals, and other products. This article provides detailed operating specifications for both semi-automatic and fully automatic bottle blowing machines, covering setup procedures, production processes, maintenance requirements, and troubleshooting techniques to ensure optimal performance and product quality.
Introduction to Bottle Blowing Machines
Bottle blowing machines, also known as blow molding machines, are industrial devices that transform plastic preforms or parisons into hollow containers through a process of heating and air pressure. These machines have revolutionized packaging production, replacing manual methods with efficient, high-speed automation capable of producing thousands of bottles per hour.
Modern bottle blowing machines come in various configurations, including semi-automatic and fully automatic models, each designed for specific production needs. Semi-automatic machines typically require some manual intervention in the loading of preforms or unloading of finished bottles, while fully automatic systems handle the entire process from preform feeding to finished product ejection without operator assistance. The choice between these types depends on production volume requirements, available workforce, and budget considerations.
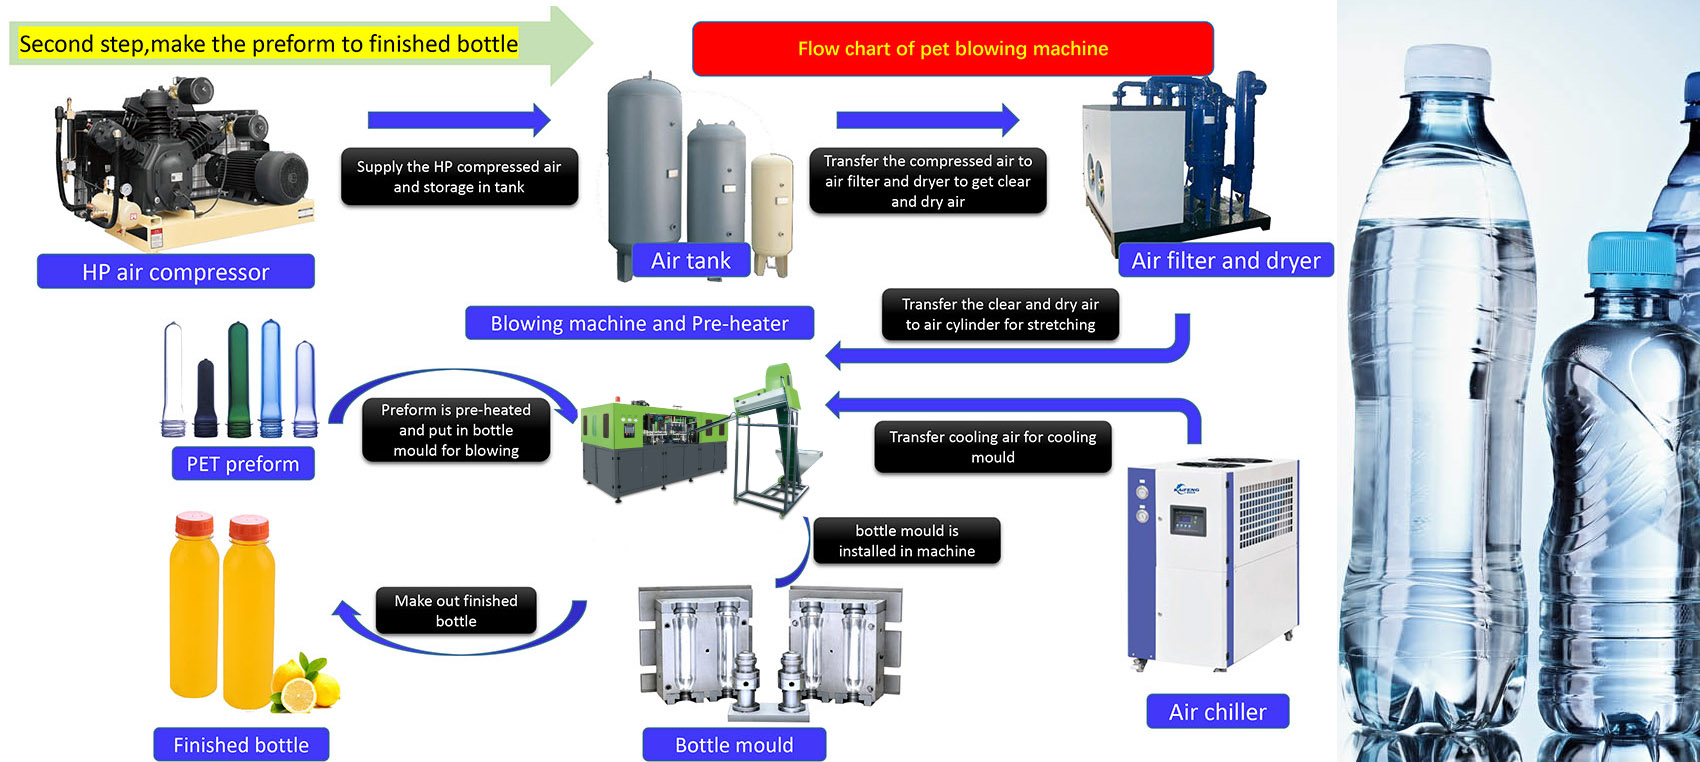
The basic working principle involves heating plastic preforms to a precise temperature where the material becomes pliable, then using compressed air to inflate the softened preform against a cooled mold cavity. This process stretches and forms the plastic into the desired container shape, which then cools and solidifies to maintain its form. The most common materials processed are PET (polyethylene terephthalate) for water and beverage bottles, PP (polypropylene) for thicker containers, and PC (polycarbonate) for reusable bottles requiring higher impact resistance.
Understanding the proper operating specifications for these machines is crucial for several reasons. First, it ensures operator safety when working with equipment that involves high temperatures, moving mechanical parts, and pressurized systems. Second, correct operation maximizes production efficiency by minimizing downtime and reducing defective products. Third, adherence to operating specifications extends equipment lifespan by preventing premature wear and damage to critical components. Finally, proper operation maintains consistent product quality, which is essential for meeting industry standards and customer expectations.
This guide will explore the detailed operating procedures for both semi-automatic and fully automatic bottle blowing machines, including pre-operation checks, startup sequences, production monitoring, shutdown processes, and routine maintenance requirements. We'll also cover common troubleshooting techniques for addressing production issues and optimizing machine performance.
Pre-Operation Checks and Setup
Before initiating any bottle blowing operation, thorough pre-operation checks are essential to ensure machine safety, functionality, and production quality. These preparatory steps form the foundation for successful production runs and should never be overlooked or rushed.
Lubrication Requirements
Proper lubrication of moving parts is critical to prevent premature wear and ensure smooth operation. Operators must apply lubricant to all active components before each shift begins. Key areas requiring attention include mechanical arms, mechanical arm guide rails, and mold opening/closing guide rails. The lubrication frequency varies by component: swing arms typically need lubrication every 3-4 days, while larger chains in heating units may only require monthly attention. Main bearing lubrication is generally performed every three months 7. Always use manufacturer-recommended lubricants and follow specified application methods to avoid contamination or over-lubrication.
Mechanical Inspection
A comprehensive mechanical inspection should precede every production run. This involves checking all fasteners, particularly in high-impact areas, to ensure they are secure and haven't loosened or fallen out. Examine belt drive systems for proper tension and alignment, looking for signs of wear or damage that could lead to failure during operation. Verify that all safety guards and covers are properly installed and secure. Pay special attention to the mold area, ensuring it's clean and free from debris that could affect product quality or damage the equipment 39.
Utility System Verification
The bottle blowing process relies on several utility systems that must be verified before operation:
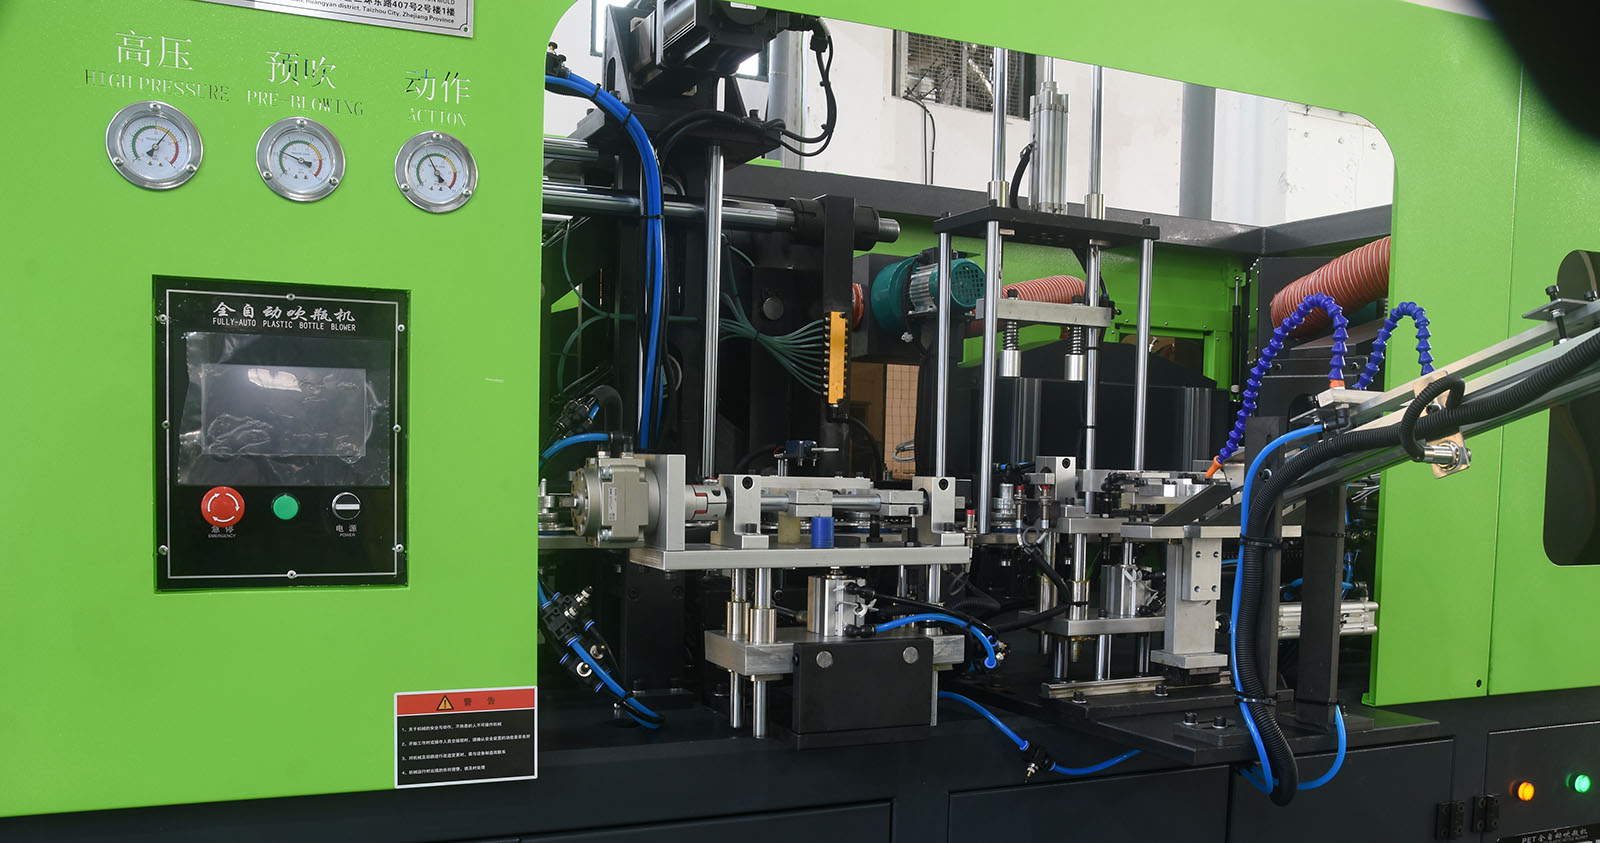
Compressed Air Systems: Check both high-pressure (typically 29-35 kg/cm² for blowing) and low-pressure (5-8 kg/cm² for machine actions) air supplies. Ensure pressure gauges show proper readings and that air lines are free from leaks. When opening air supply valves, do so gradually to prevent rapid airflow that might carry contaminants into sensitive components like solenoid valves. After opening, allow air to purge through open exhaust valves for at least 30 seconds to ensure clean, dry air reaches critical systems 19.
Electrical Systems: Verify that all power supplies meet machine requirements (common configurations include 380V/50Hz or customized voltages). Check that emergency stop buttons, safety door switches, and protective device detection switches function correctly. Inspect electrical connections for signs of damage or overheating 79.
Cooling Water Systems: Examine cooling tower and cooling tank water levels, ensuring adequate supply for continuous operation. Start cooling water pumps for both nozzle cooling and mold cooling circuits. Confirm proper water flow and temperature (typically maintained between 7-13°C) throughout the system. Cooling is particularly crucial for maintaining mold temperature and ensuring proper bottle formation 16.
Component-Specific Checks
Several critical components require individual attention during pre-operation checks:
Heating System: Inspect all heating lamps for damage or burnout, replacing any faulty units immediately. The number of heating lamps varies by machine model - for example, some machines feature 40 heating lamps across 2 heating boxes, while larger models may have up to 72 lamps in 3-4 heating boxes 6. Verify that temperature control systems are functioning and calibrated.
Pneumatic Components: Examine all pneumatic elements for leaks and test their responsiveness. Check the condition of the triple unit (filter, regulator, lubricator), ensuring it's not leaking, clogged, or overfilled with water in the reservoir 79.
Preform Handling System: Test the preform loading mechanism to ensure smooth operation. If preforms aren't loading properly, adjust the preform pressure device nuts as needed. Verify that the preform hopper has sufficient material for the planned production run 57.
Mold Condition: Inspect the mold surface for cleanliness and proper alignment. Clean and polish molds regularly to maintain product quality. Ensure mold temperature control systems are functioning correctly 79.
By methodically completing these pre-operation checks, operators can significantly reduce the risk of unexpected downtime, equipment damage, or production of defective bottles. This preparatory phase, though time-consuming, ultimately contributes to more efficient and trouble-free production runs.
Machine Startup and Operation Procedures
Proper startup sequence is crucial for ensuring smooth operation and prolonging the lifespan of bottle blowing machines. The startup process varies slightly between semi-automatic and fully automatic models, but both require careful attention to timing and system coordination to prevent equipment stress and ensure product quality.
Powering Up the System
The startup sequence begins with activating the main power supply. For fully automatic machines, after verifying all pre-operation checks are complete, operators should turn on the main power switch and briefly energize the machine for 2-3 seconds as an initial test 5. This allows systems to initialize without immediately placing full operational load on electrical components. Some advanced models may require specific initialization procedures through their control panels or touchscreen interfaces.
Gradual System Activation
Following the initial power-up, systems should be activated in a specific sequence to prevent voltage fluctuations and component stress:
Motor Activation: Start the main drive motor first, allowing it to run for approximately 30 seconds before engaging other systems. This delay helps stabilize electrical loads and prevents sudden power surges 7.
Cooling System Activation: Ensure cooling water circulation is fully operational before activating heating elements. Verify water flow through all cooling circuits, including mold cooling and nozzle cooling systems. Proper cooling is essential to prevent overheating during subsequent heating and blowing operations 39.
Heating System Activation: Initiate the heating system only after confirming adequate cooling water flow. The heating process typically requires 2-3 minutes for the oven temperature to stabilize and distribute evenly. Environmental factors affect heating time - winter conditions may require longer warm-up periods due to lower ambient temperatures, while summer conditions may allow for slightly shorter warm-up times 57.
Temperature Monitoring: Monitor heating progress through machine control panels or temperature displays. Heating lamps should reach their set temperatures uniformly across all zones. Different machine models have varying heating capacities - for example, some machines offer heating power up to 40kW with maximum capacity reaching 115kW in larger configurations 6. Only proceed to the next step when all heating zones have reached their target temperatures.
Preform Loading and Production Initiation
With systems stabilized at operating temperatures, the production process can begin:
Preform Loading: Activate the preform loading mechanism once the heating oven reaches the set temperature. For automatic machines, this involves pressing the "preform feed" button after confirming the preform hopper is adequately stocked. Some machines feature specialized preform loading systems that can handle various preform neck diameters, including automatic alignment mechanisms 6.
Blowing System Activation: Engage the blowing system after preform loading begins. On many machines, this involves pressing both the "heating start" and "blowing" buttons. Ensure the blowing electrical system is activated, as failure to do so will prevent the blowing process from initiating 7.
Initial Production Monitoring: Carefully observe the first production cycles for any abnormalities in machine operation or product quality. Listen for unusual noises that might indicate mechanical issues. Visually inspect initial bottles for proper formation, wall thickness distribution, and surface quality.
Production Speed Adjustment
Bottle blowing machines often allow production speed adjustments to match downstream equipment requirements or optimize quality:
Speed Reduction: To slow production, increase exhaust time and saturation time while simultaneously reducing overall oven temperature. As a general rule, for every 0.1 second increase in cycle time, the oven temperature should be reduced by 1% 1.
Speed Increase: To accelerate production, decrease exhaust and saturation times while raising oven temperatures proportionally. The minimum exhaust time should never fall below 0.8 seconds, as insufficient exhaust can cause bottle ejection problems due to incomplete air release 1.
Gradual Adjustments: Whether increasing or decreasing speed, make changes incrementally - no more than 0.3S at a time. After each adjustment, observe bottle quality for several cycles before making further changes. Production speed changes directly affect output - typically, each 0.1S change in blow cycle time alters hourly production by approximately 50 bottles 1.
Continuous Operation Monitoring
During normal production, operators must maintain vigilant monitoring of several key parameters:
Machine Performance: Continuously listen for abnormal noises that might indicate developing mechanical issues. Observe all moving parts for smooth operation, particularly mechanical arms and mold opening/closing mechanisms.
Product Quality: Regularly sample and inspect bottles for consistent wall thickness, proper shape formation, and surface quality. Common visual indicators include:
Milky white appearance indicates excessive heating temperature 1
Blue streaking suggests insufficient heating temperature 1
Material accumulation at the neck may require adjusting top heater temperature or reducing neck cooling water flow 1
Deformed necks typically indicate excessive neck heating 1
System Parameters: Monitor pressure gauges for consistent air pressure (typically 29 kg/cm² for high pressure systems), temperature displays for stable heating, and cooling system indicators for proper water flow and temperature.
By following these systematic startup and operation procedures, operators can maximize production efficiency while maintaining consistent product quality and minimizing equipment stress. The specific timing and sequence may vary slightly between machine models, so always consult the manufacturer's documentation for model-specific instructions.
Quality Control and Troubleshooting
Maintaining consistent product quality is paramount in bottle blowing operations, as even minor deviations in process parameters can lead to defective products. Effective quality control involves understanding common defects, their causes, and appropriate corrective actions. This section covers essential quality monitoring techniques and troubleshooting procedures for bottle blowing machines.
Common Quality Issues and Solutions
PET Bottle Transparency Problems:
Causes: Excessive heating temperature, prolonged heating time, moisture in compressed air, opaque preforms, improper preform design, or insufficient blow ratio 3.
Solutions: Reduce heating temperature, shorten heating duration, install or maintain air dryers, improve preform quality through better material drying, modify preform dimensions, or increase blow ratio by reducing preform diameter 3.
Pearlescent Whitening (Haze):
Causes: Insufficient heating temperature, uneven preform wall thickness, or excessive preform thickness causing inadequate heat penetration 3.
Solutions: Increase temperature or reduce rotation speed in heating oven, improve preform quality control, reduce preform thickness, or adjust heating chamber height to improve surface temperature distribution 3.
Bottle Base Offset:
Causes: Premature blowing initiation, incomplete stretch rod descent, misaligned stretch rod, uneven preform wall thickness, or non-uniform heating 3.
Solutions: Delay blowing timing, increase stretch rod descent speed, realign stretch rod to center, improve preform quality, or adjust heating conditions and verify preform rotation in oven 3.
Uneven Wall Thickness:
Causes: Off-center stretch rod position, asymmetric or uneven blow nozzles, insufficient stretch ratio or blow ratio, non-rotating preforms during heating, or inconsistent preform wall thickness 3.
Solutions: Center the stretch rod, adjust blow nozzle positions and diameters, increase stretch or blow ratios, check and repair rotation mechanisms, or improve preform quality 3.
Excessive Thickness at Bottle Top:
Causes: Low upper section temperature, vent holes positioned too far from top, low stretch ratio, insufficient upper blow ratio, or slow stretch rod speed 3.
Solutions: Increase upper heating zone temperature, reposition vent holes closer to top, increase stretch ratio, modify bottle shape design, or adjust stretch rod speed 3.
Thin Bottle Bases:
Causes: Early blowing initiation, excessive base temperature, or thin preform base sections 3.
Solutions: Delay blowing start time, reduce bottom heating zone temperature, or modify preform base design for increased thickness 3.
Prominent Parting Lines:
Causes: Insufficient mold clamping force, early sealing time, mold defects, or preform neck dimensions incompatible with mold 3.
Solutions: Increase clamping pressure (adjusting clamp support angle to <5 degrees), adjust mold closing limit switch position, repair or realign mold components, or modify mold neck interface 3.